The Circling Approach - Finally Explained So It Actually Makes Sense
A step-by-step technique for flying the circling approach with confidence - the 45° break, 30-second rule, half-track-width correction, and constant-angle final turn. With Cirrus SR22T examples.
On this page
Circling approaches have a reputation for being the most uncomfortable maneuver in instrument flying. You’ve just broken out of the clouds at minimums, you’re low, configured, and now you need to fly a visual pattern you rarely practice - at an altitude that leaves zero margin for creative problem-solving.
The reason most pilots dread circling isn’t the maneuver itself. It’s that nobody ever gives them a repeatable, mechanical technique that works every time. Instead, you get vague guidance like “maintain visual contact and transition to the landing runway.” Thanks, very helpful at 500 feet AGL in rain.
This article gives you the technique I use - broken down into discrete, executable steps that work in any single-engine aircraft and that I fly regularly in my Cirrus SR22T. Once you internalize this sequence, circling goes from “I hope this works out” to “I know exactly what I’m doing at every point.”
The Setup: What You Need Before You Start
Before we get into the maneuver, let’s establish the ground rules:
Configuration: You should be fully configured for landing before you even think about circling. In the SR22T, that means full flaps (100%), gear down (it’s fixed, so you’re welcome), and approach speed - typically 85-90 KIAS. The goal is to be in landing configuration at MDA so your workload during the circle is purely about flying the pattern, not managing the airplane.
Speed: Your circling speed determines your aircraft category, which determines your protected airspace and your circling minimums. The SR22T at approach speed is Category A (up to 90 knots). Stay in Category A - don’t let speed creep up or you’ll need higher minimums that may not be published.
Minimum Descent Altitude: You fly the instrument approach down to the circling MDA - not the straight-in MDA, not the DA. The circling MDA. This number is on the approach plate, and it’s your floor until you’re in position to land.
The Technique: Six Steps to a Perfect Circle
Step 1: Arrive at MDA in NAV Mode - Level Off
Fly the instrument approach normally. When you reach the circling MDA, level off and stay in NAV mode (or continue tracking the approach course). Don’t disconnect the autopilot yet. Let the airplane fly the approach course while you transition your eyes outside to acquire the runway environment.
This is the moment most pilots rush. Don’t. You’re at MDA, you’re configured, you’re stable. Take a breath. Your job now is simple: find the runway.
Step 2: Fly to the Runway - Establish Visual Contact
Continue tracking inbound on the approach course at MDA until you have the runway environment in sight. Under EASA PANS-OPS and FAA rules, you need to see enough of the airport environment to maneuver visually - runway, approach lights, threshold, or other identifiable references.
Key point: Do NOT descend below MDA yet. You’re flying level toward the airport at circling altitude. You’re going to fly until you can see the runway you intend to land on. Think of it as flying a downwind leg at MDA.
If the runway you need is on the opposite side, you may need to overfly the field at MDA to position yourself for the pattern. That’s perfectly fine - stay at MDA, keep the airport in sight.
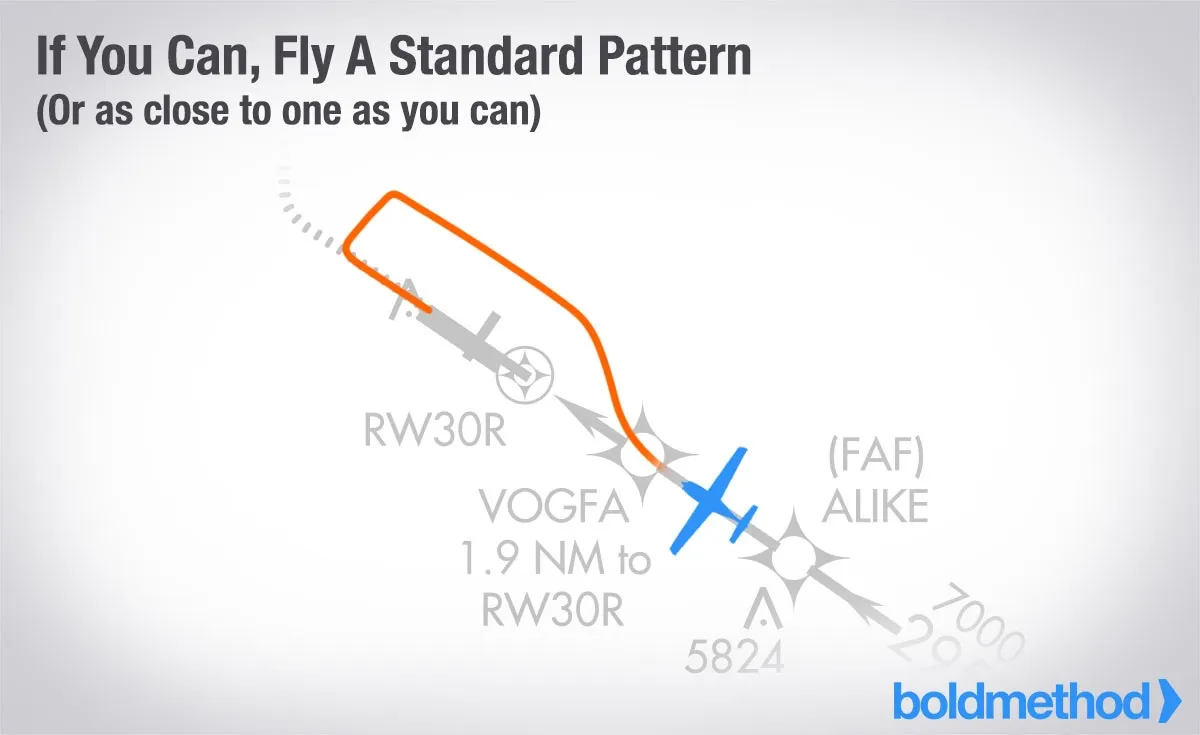
Step 3: The 45° Break - Begin Circling
This is where most pilots get lost, and it’s actually the simplest part once you have a technique.
When you’re abeam the runway threshold (or the point where you want to begin your downwind), initiate a 45° break turn away from the runway. This is not a gentle meander - it’s a deliberate, purposeful 45° heading change to establish yourself on a downwind leg.
Why 45°? Because it gives you a predictable, repeatable entry onto the downwind. Every time. You don’t have to eyeball it, you don’t have to estimate. Turn 45° off the runway heading, and you’re on downwind.
In the SR22T: Disconnect the autopilot. Bank 20-25°, turn to a heading that is the runway heading ± 45°. For example, if you’re circling to runway 27 and you’re breaking to the left, your initial heading will be approximately 225° (270° - 45°).
Step 4: The Half-Track-Width Correction - Stay Tight
Here’s where most pilots go wrong: they fly the downwind too far from the runway. In a circling approach, you’re at MDA - typically 400-600 feet AGL. A normal traffic pattern is 1,000 feet AGL with a mile-wide downwind. You don’t have that luxury. You need to stay tight.
The rule: if you notice you’re drifting more than half a track width away from where you want to be, immediately correct back toward the runway heading. Don’t let the pattern expand. A half-track-width error at circling altitude means you’re about to lose sight of the runway, and losing sight means going missed.
What’s a “track width”? Think of it as the lateral distance between you and the runway while on downwind. At circling altitude, your downwind should be roughly 0.5-0.7 NM from the runway - much tighter than a normal VFR pattern. If you see yourself drifting beyond that, turn toward the runway by 10-20° to correct.
Wind awareness is critical here. A tailwind on downwind will push you away from the runway. Crab into it. A headwind on downwind (meaning a tailwind on final) means you’ll need extra room. Adjust, but always err on the side of staying close.
Step 5: The 30-Second Rule - Time Your Base Turn
This is the universal rule that works in any aircraft, at any airport, and transforms the circling approach from art into science:
After passing abeam the landing point (threshold), count 30 seconds, then begin your base turn.
Why 30 seconds? At typical approach speeds (80-100 knots), 30 seconds of downwind travel beyond the abeam point gives you approximately the right distance to fly a stable base-to-final turn and arrive at the runway on a normal 3° glidepath. It accounts for the turn radius and the descent you need to make.
This rule works because:
- At 90 knots groundspeed, 30 seconds = 0.75 NM of travel
- Your base turn (roughly 90°) at 20° bank takes about 15-20 seconds
- By the time you roll wings-level on final, you’re roughly 1 NM from the threshold
- A standard 3° glidepath from 400-500 feet AGL works out to about 1-1.3 NM
Adjust for wind: If you have a strong tailwind on the downwind leg (which means headwind on final), you may need to shorten to 25 seconds - you’ll have less groundspeed on final and won’t need as much distance. If you have a headwind on downwind (tailwind on final), extend to 35 seconds - you’ll be fast on final and need more room.
In the SR22T: At 85 KIAS with no wind, 30 seconds works almost perfectly every time. I’ve tested this extensively. Start your timer when the threshold passes your wing, count to 30, begin the turn.
Step 6: The Constant-Angle Final Turn - 25° and Hold
When your 30 seconds are up, begin your turn to final. Here’s the key technique:
Shortly after passing the landing point (your abeam reference), begin a turn at approximately 25° bank angle and hold it constant.
Don’t think of this as “turning base, then turning final.” Think of it as one continuous, constant-bank turn from downwind to final. The 25° angle is shallow enough to keep you stable and safe at low altitude, but steep enough to bring you around to the runway alignment efficiently.
During this turn:
- Begin your descent. You’ve been at MDA until now. As you begin the turn to final, start descending toward the runway. You should be descending at a rate that puts you on a normal glidepath - roughly 500-700 fpm in the SR22T.
- Keep the runway in sight. In a left circling pattern, the runway will be visible out your left window throughout the turn. If you lose sight, go missed immediately.
- Adjust bank as needed. If you’re undershooting (going to pass behind the runway), steepen slightly to 30°. If you’re going to overshoot (turning too tight), shallow out to 20°. But 25° is the starting point.
Roll out on final aligned with the runway. You should be on a short, stable final - roughly 0.5-0.75 NM from the threshold, descending on a normal glidepath, configured, and ready to land.
The Complete Sequence - Your Circling Checklist
Here it is, the entire maneuver distilled into a checklist you can tape to your kneeboard:
- Approach → MDA - Fly the instrument approach, level off at circling MDA, stay in NAV mode
- Track inbound - Continue at MDA until runway environment is in sight
- Break 45° - When abeam the threshold, turn 45° away to establish downwind
- Fly downwind tight - Half-track-width rule: if drifting wide, correct immediately
- 30 seconds after abeam - Begin base/final turn
- 25° constant bank - One continuous turn, begin descent, keep runway in sight
- Roll out on final - Aligned, descending, configured, land
If at any point you lose the runway - go missed immediately. No heroics, no searching. Climb to MDA, follow the missed approach procedure.
Common Mistakes and How to Avoid Them
Flying too wide on downwind
This is mistake #1. Pilots instinctively fly their normal VFR pattern width, which at circling altitude means you lose sight of the runway in the turn. Stay tight. Half a mile from the runway, not a full mile.
Not timing the downwind
Without the 30-second rule, pilots either turn too early (steep, unstable final) or too late (long, dragged-in approach from too far out). Use the timer. It’s not cheating - it’s technique.
Descending too early
Stay at MDA until you begin the base/final turn. The temptation to “get down” as soon as you see the runway is strong. Resist it. You descend when you turn to final, not before. MDA is your friend - it keeps you in the protected airspace.
Breaking too aggressively
The 45° break is deliberate but not aggressive. 20-25° bank, 45° heading change. You’re not flying a fighter break. You’re positioning yourself on a close-in downwind at low altitude. Smooth and deliberate wins.
Forgetting the wind
Wind correction on a tight downwind at 400 feet AGL matters far more than at 1,000 feet in the VFR pattern. A 15-knot crosswind can push you half a track width off course in seconds. Crab into it from the start.
Cirrus SR22T Specifics
The SR22T is a forgiving airplane for circling approaches if you set it up right:
- Configuration: Full flaps (100%), 85 KIAS. The SR22T is stable and predictable in this configuration. Don’t try to circle at 100+ knots with half flaps - you’ll be in Category B and your workload goes up.
- Autopilot: Use it on the approach down to MDA. Disconnect for the circling maneuver. The Garmin GFC 700 autopilot is excellent, but the circling is a hand-flying exercise.
- Visibility: The SR22T has good visibility from both sides, which helps enormously in keeping the runway in sight during the circle. In a left circling pattern, lean forward slightly to keep the runway visible through the turn.
- Go-around: If you need to go missed, full power, flaps to 50%, pitch up, positive rate, clean up. The SR22T has plenty of power for a go-around even from a fully configured state.
Why This Technique Works
The beauty of this approach is that every step is mechanical and repeatable. There’s no judgment call about “how far should I fly downwind” or “when should I start turning.” The 45° break, 30-second rule, and 25° constant-angle turn give you a complete, deterministic sequence.
I’ve flown this technique at airports from EDAZ Schönhagen to mountain airfields in the Alps, in VMC and at real IMC minimums. It works every time because it removes the guesswork. Once you’ve practiced it five times, it becomes automatic - and circling goes from being the maneuver you dread to the one where you think, “I’ve got this.”
Practice it first in VMC: fly a normal approach, level off at what would be your circling MDA, and execute the pattern. Do it five times. Then do it under the hood with a safety pilot. By the time you need it for real, it’ll be second nature.
Regulatory Reference
FAA (14 CFR Part 91 / AIM 5-4-20)
- Circling minimums by aircraft category (A, B, C, D, E)
- Protected area defined by arc radius from runway ends (1.3 NM for Cat A, 1.5 NM for Cat B)
- Loss of visual contact requires immediate missed approach
- Cannot descend below MDA until in position to land with normal maneuvers
EASA (PANS-OPS / EU 2017/783)
- Uses ICAO obstacle clearance criteria with larger protected areas
- Visual maneuvering areas defined by category
- Circling altitude provides 300 ft obstacle clearance (Cat A/B)
- Continuous visual reference with the runway environment required
The core technique is the same under both regulatory frameworks. The minimums and protected areas differ slightly, but the 45° break, 30-second rule, and constant-angle final turn work identically regardless of which authority issued your license.
Related articles
Cirrus SR22TN Procedures
Complete operating procedures for the Cirrus SR22TN - speeds, takeoff, climb, LOP operations, traffic pattern, landing, IFR approaches, maneuvers, and emergencies.
LPV vs LNAV/VNAV - Understanding RNAV Approach Minimums
A complete breakdown of the differences between LPV and LNAV/VNAV approaches, including WAAS, SBAS requirements, decision altitudes, and when to use each type.
Flying the Cirrus SR22T Across Europe
Adventures and learnings from flying a Cirrus SR22T based at Schönhagen airfield near Berlin.